This section makes frequent use of data contained in the Technical Requirements.
All relevant sections of the Technical Requirements Data collection should be completed or known before commencing with the steps in this section.
Create CUBE User
VSM requires the user to be created on any Cisco IOS device. The user is required to run show commands.
User can be created using one of two options.
TACACS Option
If the client is using TACACS or Radius to control IOS users, ask the client to create an account that can access the CUBE with level 5 privileges.
Confirm with the TACACS team that you can run 'show' commands with the created account.
Test the account by logging into the CUBE (SSH to CUBE with the created account) and run ALL the commands shown below.
Make sure each command displays some output after being run.
Router# show running-config
Router# show startup-config
Router# show platform software mount
Router# show version
Router# show dial-peer voice summary
Local User Option
Login to IOS and enter the following commands:
Router        # Conf t
Router(config)# username {Enter User Here} privilege 5 Password  {Type Password}
Router(config)# privilege exec level 5 show platform software mount
Router(config)# privilege exec level 5 show dial-peer voice summary
Router(config)# privilege exec level 5 show version
Test the account by logging to the CUBE (SSH to CUBE with the account created) and run ALL the commands shown below.
Make sure each command displays some output after being run.
Router# show running-config
Router# show startup-config
Router# show platform software mount
Router# show version
Router# show dial-peer voice summary
CUBE SNMP Configuration
There are two options for SNMP monitoring of the CUBE, SNMP Version 2c and SNMP version 3. SNMP Version 3 is more secure and is the preferred method.
SNMP Version 2 option
To configure SNMP V2c monitoring of the CUBE you will need the following:
| Parameter | Description |
|---|---|
| VSM Collector IP Address | IP address of the VSM Collector at the customers site |
Configure the SNMP Community using the following commands:
Router        # Conf t
Router(config)# snmp-server community virsae RO
Router(Config)# snmp-server host {VSM Collector IP Address} version 2c virsae
Router(Config)# snmp-server enable traps
Router(Config)#exit
Use the following commands to verify SNMP V2 Configuration
Router # Show snmp community  << This will display configured community string
Router # show snmp host       << This should display the configured SNMP host which should match the configured one
The following example demonstrates a sample configuration of SNMP Version 2 with option to enable all traps
Router        # Conf t
Router(Config)# snmp-server community virsae RO
Router(Config)# snmp-server host 10.10.10.20 version 2c virsae
Router(Config)# snmp-server enable traps
Router (Config) # Exit
Verification output :
Router    # Show snmp Community
Community name: virsae
Community Index: virsae
Community SecurityName: virsae
storage-type: nonvolatile        active

Router # Show snmp host
Notification host: 10.10.10.20        udp-port: 162   type: trap  user: virsae       security model: v2c
SNMP Version 3 option
To configure SNMP v3 monitoring of the CUBE you will need the following:
| Parameter | Value | Description |
|---|---|---|
| View Name | Virsaeview | Use Virsaeview by default |
| Group Name | Virsaegroup | Use Virsagroup by default |
| User Name | The SNMP Trap username administered in your VSM equipment location | |
| Authentication Protocol | SHA or MD5 | The SNMP Trap Authentication protocol administered in your VSM equipment location |
| Authentication Password | The SNMP Trap Authentication password administered in your VSM equipment location | |
| Privacy Protocol | AES 128, AES 196, AES 256, DES | The SNMP Trap privacy protocol administered in your VSM equipment location |
Privacy Password | The SNMP Trap privacy password administered in your VSM equipment location | |
| VSM Collector IP Address | The IP address of the VSM Collector |
The SNMP Trap configuration in VSM is documented here SNMP Configuration
Configure the SNMP V3 using the following commands:
Router        #  Conf t
Router(config)# snmp-server view <View Name> iso included
Router(Config)# snmp-server group <Group Name> v3 priv read <View Name>
Router(Config)# snmp-server user <User Name> <Group Name> v3 auth <Authentication Protocol> <Authentication Password> priv <Privacy Protocol> <Privacy Password>
Router(Config)# snmp-server host <VSM Collector IP Address> version 3 priv <User Name>
Router(Config)# exit
Example (View name=Virsaeview, Groupname = Virsaegroup, Username = Virsaesnmp):
Router(Config)# snmp-server view Virsaeview iso included
Router(Config)# snmp-server group Virsaegroup v3 priv read Virsaeview
Router(Config)# snmp-server user Virsaesnmp Virsaegroup v3 auth sha P@ssword123 priv aes 256 P@ssword123
Router(Config)# snmp-server host 192.168.5.180 version 3 priv Virsaesnmp
Router(Config)# snmp-server enable traps
Router(Config)# Exit
Use the following commands to verify the SNMP V3 Configuration is correct administered:
Router # Show snmp user  << This will display configured snmp V3 user
Router # show snmp host  << This should display the configured SNMP host which should match the configured one
Example Verification output :
Router    # Show snmp user
User name: Virsaesnmp
Engine ID: 800000090300005056BA6363
storage-type: nonvolatile        active
Authentication Protocol: SHA
Privacy Protocol: None
Group-name: Virsaegroup


Router # Show snmp host
Notification host: 192.168.5.180  udp-port: 162   type: trap user: Virsaesnmp     security model: v3 auth
CDR Configuration
Voice Quality Metrics (VQM) Configuration
Router    #Conf t
Router (config)# voice service voip
Router (conf-voi-serv)# callmonitor
Router (conf-voi-serv)# media statistics
Router (conf-voi-serv)# exit
Enter media monitoring command for each required dial-peer in order to enable monitoring of the calls on each dial peer
Router    #Conf t
Router (config)# dial-peer voice <tag> voip
Router (config-dialpeer)# media monitoring
Router (config-dialpeer)# end
RADIUS Accounting Configuration
There are two possible options for configuring RADIUS accounting
1- VSM is the only RADIUS Server to be configured on Cisco CUBE
2- VSM is not the only RADIUS Server , There is an existing RADIUS Server Set up on Cisco CUBE for AAA Operation
Single RADIUS Server Option (VSM Only)
Perform the following steps to configure CUBE as Radius client to send accounting information to VSM
Router    #Conf t
Router (config)# aaa new-model
Router (config)# radius server VSM
Router (config-radius-server)# address ipv4 <VSM Probe IP Address> auth-port  1812 acct-port 1813
Router (config-radius-server)# key <shared secret - this key to be used in VSM Web Portal>
Router (config-radius-server)# exit
Router (config)# aaa group server radius VSMradiusgroup
Router (config-sg-radius)#server name VSM
Router (config-sg-radius)#ip radius source-interface <Enter Interface Name that will be used to send CDR information to VSM>
Router (config-sg-radius)#exit
Router (config)#aaa accounting connection h323 start-stop group VSMradiusgroup
Router (config)#gw-accounting aaa
Router (config-gw-accounting-aaa)# acct-template callhistory-detail
Router (config-gw-accounting-aaa)# exit
Router (config)# radius-server vsa send accounting
Router (config)# exit
Multiple RADIUS Servers option
If Cisco CUBE has already been configured to use other Radius server for AAA operations make sure that this server is placed in another server group by using the following commands .
Router    #Conf t
Router (config)# aaa group server radius <groupname>
Router (config-sg-radius)# server <ip-address > auth-port 1812 acct-port 1813
Router (config-sg-radius)# exit
Router (config)# aaa authentication login default group <groupname> local
Router (config)# aaa authorization exec default group <groupname> none
Router (config)# aaa accounting exec default start-stop group <groupname>
Router (config)# radius-server host <ip-address> auth-port 1812 acct-port 1813 key <shared-secret>
Router (config)# exit
| Parameter | Value |
|---|---|
| groupname | Name of the server group which contains all the RADIUS Servers being used for AAA operations. |
| ip-address | The IP address of the RADIUS Server group being used for AAA operations |
| <shared-secret> | Secret Key used to authenticate with the RADIUS Server |
Follow the steps mentioned in Single RADIUS Server option to send call accounting details to VSM.
CUBE Syslog Configuration
Enter the IP Address of the VSM Probe as the destination for the log files.
Syslog files have logging based on the client's logging configuration.
Router(Config)# logging host (Enter VSM Collector IP Address)
Router(Config)# logging traps
Once complete you can move onto the VSM Web Portal Configuration
Web Portal Configuration
Add CUBE
Log in to the VSM web portal using your VSM credentials and password.
For your customer, select Service Desk > Equipment Locations. Right-click on the Equipment Location (Appliance) that will serve this particular UC Server and select ‘Manage Equipment’.
At the bottom of the ‘Manage Equipment’ page, click the ‘Add Equipment’ button.
A form will open which you can populate with the equipment details as per the table below.
Select the Vendor ‘Cisco Systems’ and Product ‘Unified Border Element’.

If you are adding more than one piece of the same equipment type, check the ‘Add another’ box at the bottom of the form and the bulk of the configuration will be carried over for the next item.
| Field | Setting |
|---|---|
Vendor | Cisco Systems |
Product | Unified Border Element |
Equipment Name | Friendly name for this CUBE |
Username | Administrative Username |
Password | Administrative Password |
IP Address / Host Name | IP Address of server (Virtual in duplicated servers) |
Site | Free text field, this information will be included in alarm notifications from the VSM Workflow. |

Site ID information in the ‘Site’ field will advise your NOC staff of the site where the Microsoft Server (i.e. the VSM Collector) is physically located.
This is particularly helpful when the customer has multiple sites.
SNMP
Complete the Equipment tab and then click on the ‘SNMP Query’ tab.
Click on the down arrow, and select the SNMP version you wish VSM to use for querying the CUBE:
SNMP V1 or V2
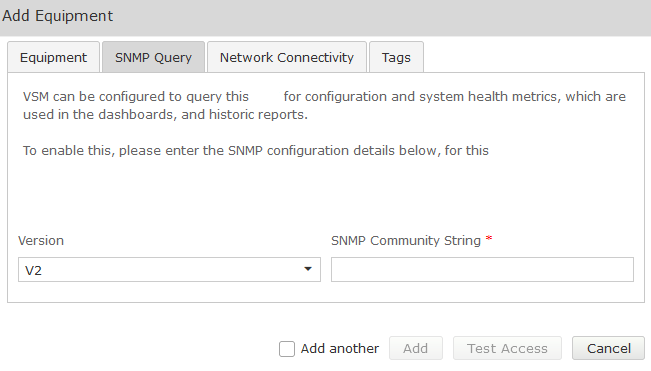
| Field | Setting |
|---|---|
Version | V1, V2 |
SNMP Community String | Community String as administered on the CUBE |
SNMP V3
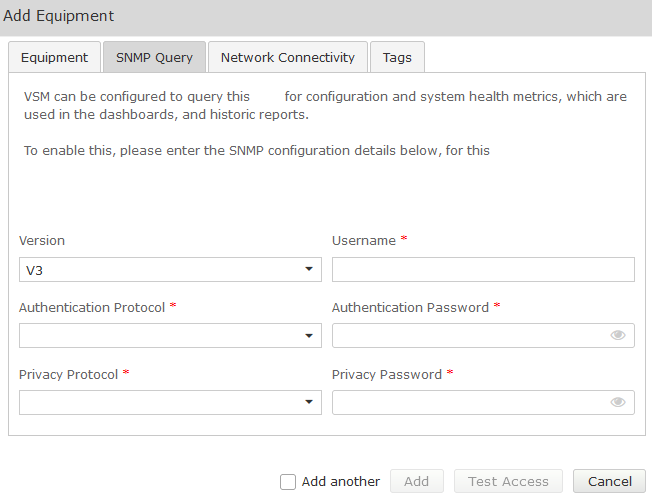
| Fields | Setting |
|---|---|
Version | V3 |
Username | SNMP V3 Username (refer to technical requirements forms) |
Authentication Protocol | SHA (Recommended) |
Authentication Password | Password (refer to technical requirements) |
Privacy Protocol | DES (Recommended) |
Privacy Password | Password (refer to technical requirements forms) |
Test Access
Once all fields are populated Click on the Test Access button. This will test that VSM can connect to the CUBE using the settings you have entered:

Both SSH and SNMP should return success. If not, troubleshoot the configuration.
- The SSH test ensures the VSM probe can connect to, and log in using the account configured.
- The SNMP test ensures an SNMP query can be run.
Once testing is successful, click Add.