This section makes frequent use of data contained in the Technical Requirements.
All relevant sections of the Technical Requirements Data collection should be completed or known before commencing with the steps in this section.
Create vCenter User
VSM requires a user account to be created on vCenter, in order to run API commands which collect the status of the virtual machines running on vCenter.
vCenter users can be created via one of two options:
Local User Option
Login to the vSphere web client. You will need administrative privileges to complete these operations.
From the home menu, click on Administration.
In "Administration", click on "Users and Groups".
Choose the correct domain from the domain list.
You can not use 'localos' Domain to Add user.
Click the "ADD USER" link.
Fill in the required user details as per the table below.
| Field | Description | Mandatory / Optional |
|---|---|---|
| Username | Enter Username to be used with VSM | Mandatory |
| Password | Enter Password | Mandatory |
| Confirm Password | Enter Password again | Mandatory |
| First Name | Enter User First Name | Optional |
| Last Name | Enter User Last Name | Optional |
| Enter User Email Address | Optional | |
| Description | Enter Description for the user | Optional |
Role Assignment
Navigate to Administration >> Global Permissions
Click on the icon.
Enter the username created earlier in User/Group field and select 'Read-Only' from the Role dropdown list, then click ok.
Check that what you have entered is correct, if it is then click 'OK'.
Make sure the user appears under User/Group with Role the "Read-only".
Active Directory Option
There are two scenarios for Active Directory:
- The client uses Active Directory to create a user and assign permissions via group policy to vCenter Users.
- If so, ask the Client to create a vCenter account with Read-Only access.
- The client uses Active Directory for vCenter user creation only, and not assigning permissions.
- If so, ask the Client to create a vCenter account via Active Directory, then follow the steps detailed in the Role Assignment section to assign Read-Only permission to the User.
SNMP Configuration
Configure SNMP V1/V2
This consist of the following tasks
Configure SNMP Community String
This step can be skipped if you have Community String Configured
Access the appliance shell and log in as a user who has the administrator or super administrator role
The default user with super administrator role is root.
Run the snmp.set --communities command to configure an SNMP community
For example, to configure public, VSM communities, run the following command:
| snmp.set --communities public,VSM |
Each time you specify a community with this command, the settings you specify overwrite the previous configuration.
To specify multiple communities, separate the community names with a comma.
Additional details can be found here
Configure the SNMP Agent to Send v1 or v2c Notifications
Access the appliance shell and log in as a user who has the administrator or super administrator role
The default user with super administrator role is root.
Make sure SNMP agent is enabled, if not enable it by running snmp.enable command
Run the snmp.set --targets target_address@port/community command to send SNMP Notifications to VSM.
Use the following for SNMP target Parameters
| Field | Description |
|---|---|
| target_address | Enter VSM Probe IP Address |
| Port | Enter the SNMP Port, if no value is specified then the default port 161 will be used |
| community | Enter the Community String to be used |
For example, run the following command for configuring the targets 192.0.2.1 with community VSM
| snmp.set --targets 192.0.2.1/VSM |
Each time you specify a target with this command, the settings you specify overwrite all previously specified settings. To specify multiple targets, separate them with a comma.
Run snmp.test command to send a test trap to VSM.
The agent sends a warmStart trap to the configured Agent
Configure SNMP V3
Follow the following Procedure to configure SNMP V3
- Configure the SNMP Engine ID
- Configure SNMP Authentication and Privacy Protocols
- Configure SNMP V3 Users
- Configure SNMP V3 Targets
Configure the SNMP Engine ID
Every SNMP v3 agent has an engine ID, which serves as a unique identifier for the agent. The engine ID is used with a hashing function to generate localized keys for authentication and encryption of SNMP v3 messages.
Access the appliance shell and log in as a user who has the administrator or super administrator role.
The default user with super administrator role is root.
Run the snmp.set --engineid command to configure the target
The following example shows the required command to configure ID, where ID is a hexadecimal string between 4 and 32 characters.
| snmp.set --engineid 80001adc802417e202b8613f5400000000 |
Additional Details can be found here
Configure SNMP Authentication and Privacy Protocols
Access the appliance shell and log in as a user who has the administrator or super administrator role.
The default user with super administrator role is root.
To Configure authentication protocol run snmp.set --authentication (Protocol) command
The protocol can be either none, SHA1 or MD5
The following example shows the required configuration to configure authentication protocol as SHA1
| snmp.set --authentication SHA1 |
To configure privacy protocol run snmp.set --privacy (Protocol) command
The protocol can be either none or AES128
The following Example showing the required configuration to configure privacy protocol as AES128
| snmp.set --privacy AES128 |
Additional Details can be found here
If you are using authentication or privacy, get the authentication and privacy hash values for the user by running snmp.hash --auth_hash --priv_hash
Configure SNMP V3 Users
Access the appliance shell and log in as a user who has the administrator or super administrator role.
The default user with super administrator role is root.
If you are using authentication or privacy, get the authentication and privacy hash values for the user by running snmp.hash --auth_hash
The following example shows the required configuration to set up secret1 as the path to the file containing the user's authentication password and secret2 as the path to the file containing the user's privacy password
| snmp.hash --auth_hash secret1--priv_hash secret2 |
Configure the user by running snmp.set --user (userid)/(authhash)/(privhash)/(security) command
Snmp.set --user command parameters Table
| Parameter | Description |
|---|---|
| userid | Enter Username |
| authhash | Enter authentication hash value if any |
| privhash | Enter the privacy hash value if any |
| Security |
|
Additional Details can be found here
Configure SNMP V3 Targets
Access the appliance shell and log in as a user who has the administrator or super administrator role.
The default user with super administrator role is root.
Run snmp.set --v3targets (hostname@port)/(userid)/(seclevel)/(trap)
snmp.set --v3targets command parameters Table
| Parameter | Description |
|---|---|
| hostname | Enter VSM Probe IP Address |
| port | Enter the port you want to use, if not specified the default 161 will be used |
| userid | Enter SNMP v3 user name |
| secLevel |
|
Additional Details can be found here
Web Portal Configuration
Add vCenter
Log in to the VSM web portal using your credentials and password.
For the particular customer, select Service Desk > Equipment Locations. Right-click on the Equipment Location that will serve this vCenter and select 'Manage Equipment':
At the bottom of the 'Manage Equipment' page, click on the 'Add Equipment' button.
Select the Vendor 'VMWare' and the Product 'vCenter '.
If you are adding more than one piece of the same equipment type, check the 'Add another' box at the bottom of the form and the bulk of the configuration will be carried over for the next item.
Web Portal - Add vCenter Field Description
| Field | Setting |
|---|---|
| Vendor | VMware |
| Product | vCenter |
| Equipment Name | Friendly name |
| Username | API Username@domainname |
| Password | API Password |
| IP Address / Host Name | IP Address or Hostname of the vCenter server |
| Site | Friendly name for the site (where this server is located) |
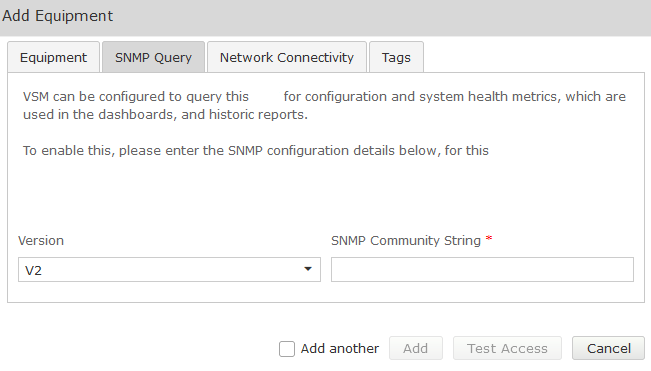
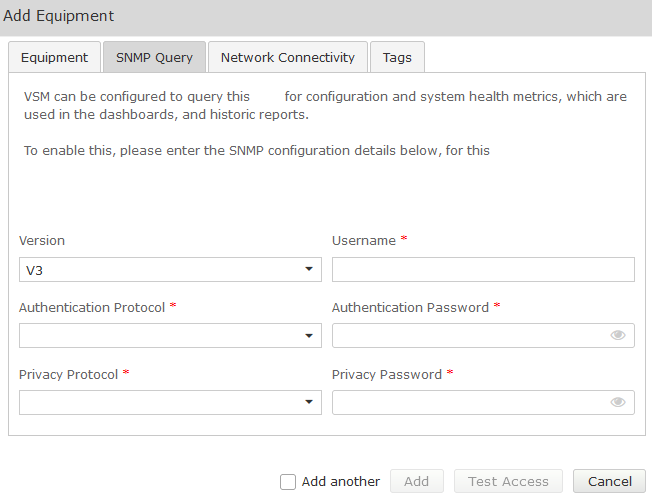
Complete the Equipment tab and then click on the ‘SNMP Query’ tab. Click on the down arrow, and select the SNMP version you wish VSM to use for querying the equipment: Version V1, V2 SNMP Community String Community String as administered on this equipment Version V3 Username SNMP V3 Username (refer to technical requirements forms) Authentication Protocol SHA (Recommended) Authentication Password Password (refer to technical requirements) Privacy Protocol DES (Recommended) Privacy Password Password (refer to technical requirements forms)SNMP
SNMP V1 or V2
Field Setting SNMP V3
Fields Setting
From the add equipment pop up you can create new tags, apply existing ones, or disassociate existing tags for a specific piece of equipment. Essentially, this tab implements the functionality on the Manage Tags page but localizes any configuration to the equipment being configured. See here for more information.Tagging
Network connectivity settings are configured at the location level and apply to all equipment by default. See here for more information. The default location-level network connectivity settings (which are detailed in the link above) may be overridden for specific equipment using this tab. You can define alarm raising conditions using all, none or a mixture of the above “Raise an alarm when” settingsNetwork Connectivity
Setting Description Disable Network Connectivity Ping for Equipment Select 'No' (this is the default) to send out ping tests. Select 'Yes' to disable ping tests from being sent out. Ping Frequency (minutes) Defines the amount of time (in minutes) between each ping test. Raise an alarm when maximum ping exceeds (x) ms Check this box and define a time (in milliseconds) to raise an alarm when the ping response time exceeds your set maximum time limit. Raise an alarm when the average ping exceeds (x) ms Check this box and define a time (in milliseconds) to raise an alarm when the ping response time exceeds your set average time limit. Raise an alarm when packet loss exceeds (x) % Check this box and define a percentage to raise an alarm when the packet loss of pings sent exceeds your set limit.
Test Access
Once all fields populated Click on the Test Access button. This will test that VSM can connect to the vCenter using the settings you have entered:
HTTPS and SNMP should return success, If not troubleshoot the configuration.
Once testing is successful click Add.


