This section makes frequent use of data contained in the Technical Requirements.
All relevant sections of the Technical Requirements Data collection should be completed or known before commencing with the steps in this section.
Configure CUC AXL User
Navigate to Cisco Unity Connection Administration >> Users >> Add New

CUC AXL User Parameters
Field | Value |
User Type | User without Mailbox |
Based On Template | Depend on the templates configured on your system if none choose administrator template |
Alias | Enter Name (this will be the logon name). |
First name | Enter First Name |
Last Name | Enter Last Name |
Display Name | Enter the Display Name |
SMTP Address | Enter value ,or can leave it blank |
Corporate Email Address | Enter Value or leave it blank,no need to have corporate mail address |

Once the user is created navigate to the user and click Edit>>Roles

Choose Read Only Administrator and click save

CUC SNMP Configuration
From the CUC server Navigate to Cisco Unified Serviceability>> SNMP and follow the steps explained in CUCM SNMP Configuration to configure SNMP.
CUC Syslog Configuration
Navigate Cisco Unity Connection Administration >>>System settings >> Enterprise parameters>>>Cisco syslog Agent >> Remote Syslog Server Name >>Enter the IP Address of VSM Prob.
Up to 5 Syslog servers can be configured so it doesn’t matter which one of them is the VSM Prob Server
From the Syslog severity for Remote Syslog messages choose the severity of Alarms (Emergency, Alert, Critical, Error, Warning, Notice, Informational or Debug) to be sent to syslog.

CUC Backup Configuration
The following is required to configure VSM as a destination for backup files. These Backup files will be sent from the VSM Probe to the Virsae Cloud.
- Navigate Disaster Recovery System >> Backup >> Backup Device >> Add New.
- Follow the same steps described in CUCM Backup Configuration to configure Backup Device.
- Configure backup scheduler by navigating to Backup >> Scheduler.
- Define the Scheduler Name.
- Select the Device name (the device created earlier)
- Check the features you want to backup.
- Ideally, check all the options:
- Connection_GREETINGS_VOICENAMES
- CONNECTION_DATABASE
- CONNECTION_HTML_NOTIFICATION
- CONNECTION_MESSAGES_UNITYMBXDB1CUC) and,
- CUC.
- Ideally, check all the options:
- Click save
Make sure that time of the backup is after hours to avoid any performance impact.

Enable Schedule.
Web Portal Configuration
Add CUC
Log in to the VSM web portal using your credentials and password.
For your customer, select Service Desk > Equipment Locations. Right-click on the Equipment Location (Appliance) that will serve this particular UC Server and select ‘Manage Equipment’
At the bottom of the ‘Manage Equipment’ page click on the ‘Add Equipment’ Button
A form will open which you can populate with the equipment details as per table 8.
Select the Vendor ‘Cisco Systems’ and Product ‘Unity Connection’.

Web Portal – Add CUC Field Description
Field | Setting |
Vendor | Cisco Systems |
Product | Unified Communications Manager |
Equipment Name | Friendly name for this CUC |
Username | Administrative Username |
Password | Administrative Password |
IP Address / Host Name | IP Address of server (Virtual in duplicated servers) |
Site | Free text field, this information will be included in alarm notifications from the VSM Workflow. |
Use Cisco APIs | Checked |

Complete the Equipment tab and then click on the ‘SNMP Query’ tab.
Click on the down arrow, and select the SNMP version you wish VSM to use for querying the CUC:
SNMP V1 or V2
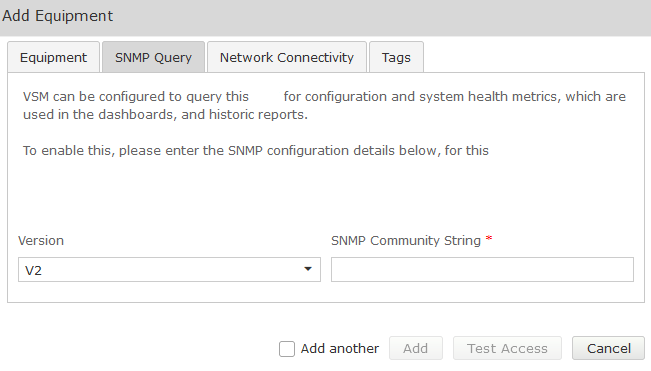
CUC SNMP V1/V2 Field Descriptions
Fields | Setting |
Version | V1, V2 |
SNMP Community String | Community String as administered on the CUC |
SNMP V3
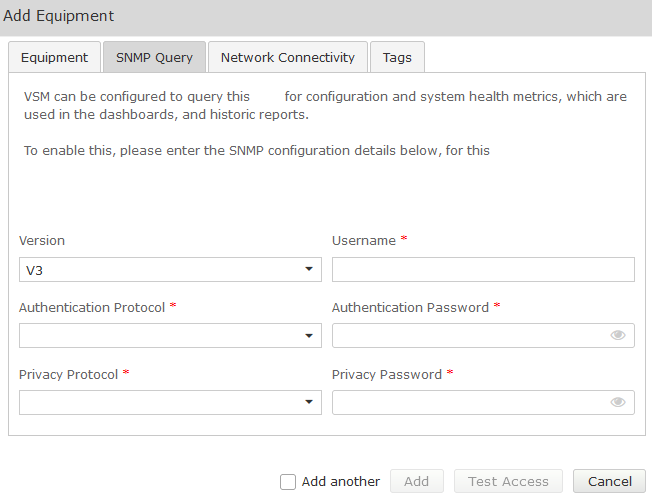
CUC SNMP V3 Field Description
Fields | Setting |
Version | V3 |
Username | SNMP V3 Username |
Authentication Protocol | SHA (recommended) |
Authentication Password | Password |
Privacy Protocol | DES (recommended) |
Privacy Password | Password |
Test Access
Once all fields are populated Click on the Test Access button. This will test that VSM can connect to the CUC using the settings you have entered:
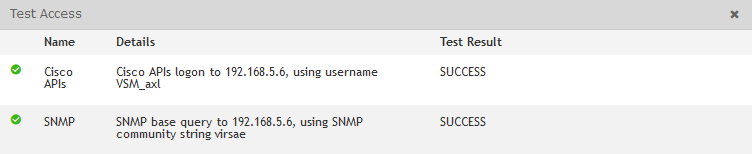
Both SSH and SNMP should return success. If not, troubleshoot the configuration.
Once testing is successful, click Add.