This section makes frequent use of data contained in the Technical Requirements.
All relevant sections of the Technical Requirements Data collection should be completed or known before commencing with the steps in this section.
Web Portal Setup
Avaya Ethernet Switches are set up in VSM to enable Access Concentrator, to add a friendly name and default site for alarming purposes, as well as facilitating an offsite backup capability.
To add an Avaya Ethernet Switch to VSM select the customer, then navigate to Service Desk> Equipment Locations. Right-click on the Equipment Location (Appliance) that will serve this particular UC Server and select ‘Manage Equipment’
At the bottom of the ‘Manage Equipment’ page click on the ‘Add Equipment’ Button
A form will open which you can populate with the equipment details.
Select the Vendor ‘Avaya’ and Product ‘Ethernet Switch’.

If you are adding more than one piece of the same equipment type check the ‘Add another’ box at the bottom of the form and the bulk of the configuration will be carried over for the next item.
Avaya Ethernet Switch Field descriptions
Field | Setting |
Vendor | Avaya |
Product | Ethernet Switch |
Equipment Name | Friendly Name of the device |
IP address/Host Name | IP Address or FQDN of the device |
Username | Administrative Username |
Site | Free text field, this information will be included in alarm notifications from the VSM Workflow. |
Password | Administrative Password |
Command Set | Choose Ethernet Switch model from the drop-down |

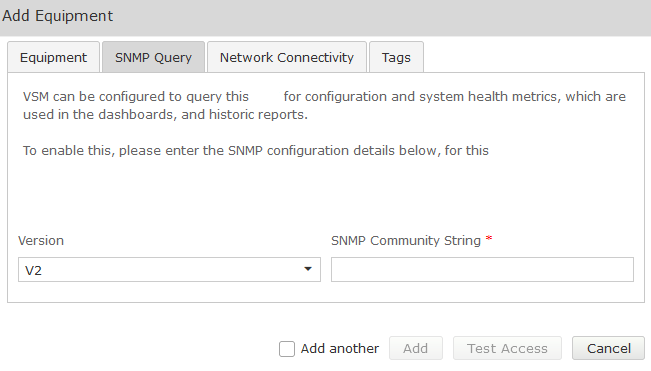
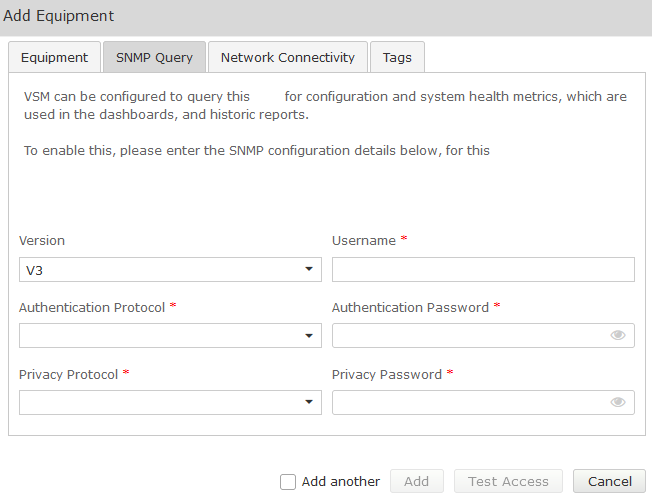
Complete the Equipment tab and then click on the ‘SNMP Query’ tab. Click on the down arrow, and select the SNMP version you wish VSM to use for querying the equipment: Version V1, V2 SNMP Community String Community String as administered on this equipment Version V3 Username SNMP V3 Username (refer to technical requirements forms) Authentication Protocol SHA (Recommended) Authentication Password Password (refer to technical requirements) Privacy Protocol DES (Recommended) Privacy Password Password (refer to technical requirements forms) Network connectivity settings are configured at the location level and apply to all equipment by default. See here for more information. The default location-level network connectivity settings (which are detailed in the link above) may be overridden for specific equipment using this tab. You can define alarm raising conditions using all, none or a mixture of the above “Raise an alarm when” settings From the add equipment pop up you can create new tags, apply existing ones, or disassociate existing tags for a specific piece of equipment. Essentially, this tab implements the functionality on the Manage Tags page but localizes any configuration to the equipment being configured. See here for more information.SNMP
SNMP V1 or V2
Field Setting SNMP V3
Fields Setting Network Connectivity

Setting Description Disable Network Connectivity Ping for Equipment Select 'No' (this is the default) to send out ping tests. Select 'Yes' to disable ping tests from being sent out. Ping Frequency (minutes) Defines the amount of time (in minutes) between each ping test. Raise an alarm when maximum ping exceeds (x) ms Check this box and define a time (in milliseconds) to raise an alarm when the ping response time exceeds your set maximum time limit. Raise an alarm when the average ping exceeds (x) ms Check this box and define a time (in milliseconds) to raise an alarm when the ping response time exceeds your set average time limit. Raise an alarm when packet loss exceeds (x) % Check this box and define a percentage to raise an alarm when the packet loss of pings sent exceeds your set limit. Tagging

Test Access
Once all fields are populated Click on the Test Access button. This will test that VSM can connect to the AES using the settings you have entered:

Both SSH and SNMP (if configured) should return success. If not, troubleshoot the configuration.
Once testing is successful, click Save.