This section makes frequent use of data contained in the Technical Requirements.
All relevant sections of the Technical Requirements Data collection should be completed or known before commencing with the steps in this section.
There are two parts to the configuration, the first being the server(s) under management, and the second being the supporting configuration on the web portal. Both are covered in this chapter.
AEP Configuration
Adding a new AEP Login
The VSM collector requires SSH access to the AEP with AvayaAVPGroup rights (Linux user group 497). Add an account that when used provides access to the Linux bash prompt.
- Start an SSH session. At the command prompt type su root. When prompted enter the ‘root’ user password.
- Use the command 'useradd NAME'; where NAME is the account name to create and hit enter.
- Use the command 'passwd NAME'; where NAME is the account name created above and hit enter. Enter the password then hit enter (need to do this twice).
- Enter the command 'chage –M 99999 NAME'; where NAME is the account created above and hit enter to set the System Manager account password to not expire.
- Enter the command 'usermod -g 497 NAME'; where NAME is the account created above then hit enter. This will add the new user to the AvayaAVPGroup. (Note: if Group 497 does not exist the AvayaAVPGroup may be 498 or 986, to confirm you can run the command cat /etc/group and check which group number corresponds to the AvayaAVPGroup)
- Test you can login via SSH with your new credentials.
If you do not have root access Your Business Partner or Avaya should be able to create this account on your behalf.
Some versions of AEP will restrict SSH access to only the 'Cust' account. If this is the case either ask your Business Partner or Avaya to create a named account with SSH access or you can add the 'Cust' user to group 497.
Setting the SNMP Trap Destination
Set SNMP Traps via System Configuration> SNMP> Add:

AEP Trap Destination Field Description
Fields | Setting |
Enable | Yes |
Device | NMS |
Transport Protocol | UDP |
IP Address | IP address of the VSM collector |
Port | 162 |
Notification Type | Trap |
SNMP Version | 1-3 |
Security Name | The security name you choose * see note |
Authentication Protocol | SHA |
Authentication Password | Choose an Authentication Password (refer to technical requirements) |
Privacy Protocol | DES |
Privacy Password | Choose a Privacy Password (refer to technical requirements forms) |
Click Save.

Click Test. The AEP will announce “Test Alarm Notification has been sent and an Alarm has been logged. Please clear the alarm as necessary.”
Login to the VSM Web Portal. For the particular customer, select Availability Manager > Manage Alarms:

The Test Alarm should show as an alarm. If not, trouble-shoot the configuration.
Enabling SNMP Query
Set SNMP Query via System Configuration> SNMP>SNMP Agent Settings:

AEP SNMP Query Field Description
Fields | Setting |
Security Name | The security name you choose * see note |
Authentication Password | Choose an Authentication Password (refer to technical requirements) |
Privacy Password | Choose a Privacy Password (refer to technical requirements forms) |
Allow All IP Addresses | Select |
Transport Protocol | UDP |
Default Port Number (UDP:161) | Select |
Click Save.
Configuring Syslog
Navigate to the Experience Portal Web administration interface then Home > System Configuration > EPM Servers > Syslog Settings. Select whether you would like Audit Logs and Event Logs sent to Syslog.
Enter the IP Address of the VSM collector in the ‘Syslog Server IP Address’ field.

Configuring VoIP settings
To configure VoIP settings, go through the following procedure:
- Log in to the EPM Web interface using an account with the Administration user role.
- From the EPM main menu, select System Configuration > MPP Servers.
- On the MPP Servers page, click the VoIP Settings button.
- On the VoIP Settings page, enter the RTCP Receiver IP address and Port information in the RTCP Monitor section and click Save.
- If you have changed any VoIP settings, restart all MPPs

Web Portal Configuration
Add AEP
Login to the VSM web portal using your credentials and password.
For your customer, select Service Desk > Equipment Locations. Right-click on the Equipment Location (Appliance) that will serve this particular AEP and select ‘Manage Equipment’
At the bottom of the ‘Manage Equipment’ page click on the ‘Add Equipment’ Button
A form will open which you can populate with the equipment details as per the table below.
Select the Vendor ‘Avaya’ and Product ‘Experience Portal’.

If you are adding more than one piece of the same equipment type check the ‘Add another’ box at the bottom of the form and the bulk of the configuration will be carried over for the next item.
Web Portal – Add AEP Field Description
Field | Setting |
Vendor | Avaya |
Product | Experience Portal |
Equipment Name | Friendly name for this AEP |
Username | The administrative username you added to AEP earlier |
Password | The password you added to AEP earlier |
IP Address / Host Name | IP Address of server (Virtual in duplicated servers) |
Site | Friendly name for core site (where this server is located) |

SNMP
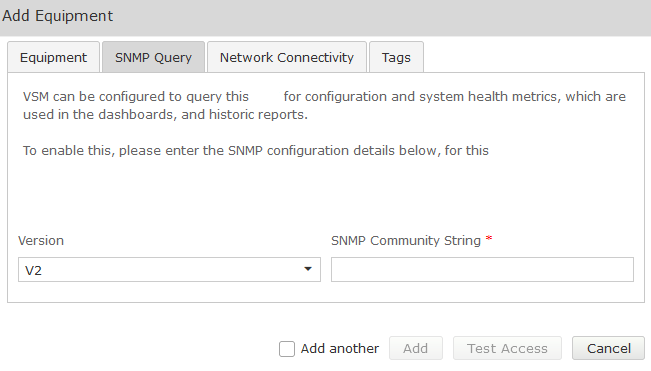
Complete the Equipment tab and then click on the ‘SNMP Query’ tab.
Click on the down arrow, and select the SNMP version you wish VSM to use for querying the equipment:
SNMP V1 or V2
| Field | Setting |
|---|---|
Version | V1, V2 |
SNMP Community String | Community String as administered on this equipment |
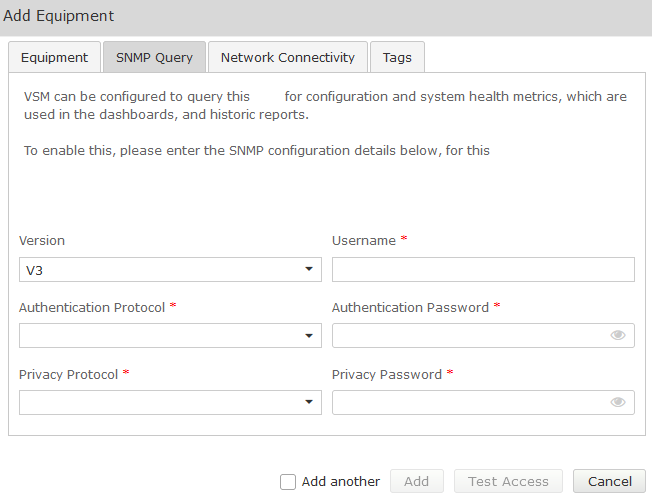
SNMP V3
| Fields | Setting |
|---|---|
Version | V3 |
Username | SNMP V3 Username (refer to technical requirements forms) |
Authentication Protocol | SHA (Recommended) |
Authentication Password | Password (refer to technical requirements) |
Privacy Protocol | DES (Recommended) |
Privacy Password | Password (refer to technical requirements forms) |
Network Connectivity

Network connectivity settings are configured at the location level and apply to all equipment by default. See here for more information.
The default location-level network connectivity settings (which are detailed in the link above) may be overridden for specific equipment using this tab.
| Setting | Description |
|---|---|
| Disable Network Connectivity Ping for Equipment | Select 'No' (this is the default) to send out ping tests. Select 'Yes' to disable ping tests from being sent out. |
| Ping Frequency (minutes) | Defines the amount of time (in minutes) between each ping test. |
| Raise an alarm when maximum ping exceeds (x) ms | Check this box and define a time (in milliseconds) to raise an alarm when the ping response time exceeds your set maximum time limit. |
| Raise an alarm when the average ping exceeds (x) ms | Check this box and define a time (in milliseconds) to raise an alarm when the ping response time exceeds your set average time limit. |
| Raise an alarm when packet loss exceeds (x) % | Check this box and define a percentage to raise an alarm when the packet loss of pings sent exceeds your set limit. |
You can define alarm raising conditions using all, none or a mixture of the above “Raise an alarm when” settings
Tagging

From the add equipment pop up you can create new tags, apply existing ones, or disassociate existing tags for a specific piece of equipment.
Essentially, this tab implements the functionality on the Manage Tags page but localizes any configuration to the equipment being configured.
See here for more information.
Test Access
Once all fields are populated Click on the Test Access button. This will test that VSM can connect to the AEP using the settings you have entered:

Both SSH and SNMP should return success. If not, trouble-shoot the configuration.
Once testing is successful, click Add.