Introduction
The RaspberryPi collector is built upon a Customer or Business Partner supplied 'Raspberry Pi 2 Model B' or 'Raspberry Pi 3 Model B' device.
Virsae will provide the software image to be loaded onto a MicroSD card. As the Raspberry Pi is purchased as a bare circuit board you will also need a suitable full enclosure case and Micro USB power supply for the Raspberry Pi.
System Requirements
System requirements for the Raspberry Pi collector are listed below:
Item | Specification |
|---|---|
CPU | Raspberry Pi 2 Model B or Raspberry Pi 3 Model B |
Power supply | 5V micro USB power supply 1.2A (1200mA) minimum |
Micro SD Card | 16GB class 8 or higher |
Case | The specific fully enclosed case for Raspberry Pi |
Installation
Make sure you have download the latest Raspberry Pi image file from the Service Desk> Files and Folders> Shared with me> Virsae> VSM> VSM Software> Raspberry Pi.
To download the latest Raspberry Pi 2 image: right-click the 'Pi2 Rev xxxx.zip '. Once downloaded, extract the file.
To download the latest Raspberry Pi 3/4 image: right-click the 'VSM Client RaspberryOS XXXX.zip' file and download. Once downloaded, extract the file.

Installation of the Raspberry Pi collector is comprised of two parts:
- Burning the ISO software image to the Micro SD Card; and
- Connecting the Raspberry Pi to the customer's network and setting customer configuration.
Prior to installation, download the RPi.zip package from Service Desk> Files and Folders> Shared with me> VSM> VSM Software> Raspberry Pi. Right-Click the 'RPi.zip' file and download.
Once downloaded, extract the file. The Zip file contains two tools that are necessary for installation: the VSM Management Tool and Win32DiskImager.
These packages are found in the same location shown in the image above.
Burning the ISO Image to Micro SD
Insert your Micro SD card into a card reader attached to your PC (You may need to use a full-size SD card adaptor for this).
Navigate to where you extracted the RPi.zip file, then go into the Win32DiskImager directory and run Win32DiskImager.exe as an Administrator.
You may receive a User Account Control dialogue, if so check the program name is correct and then select Yes:

Win32 Disk Imager should now have opened:

Click the folder icon and browse to where you extracted the disk image:

Click open.
Check that the ‘Device’ Selected is the Micro SD card you inserted and then select ‘Write’

You will be prompted to confirm that want to overwrite the existing data on the SD Card.
If you are sure that you selected the correct drive in ‘Device’ then click 'Yes'.

If you receive a ‘Write Error’, either you have a Micro SD card that is less than the required size or it already contains data:

If your Micro SD Card came pre-loaded with any software or is not new, you may need to format the card first.
Go to My Computer, identify the card and right-click the drive. Select Format, then format the card as a Fat32 and check 'Quick Format'.


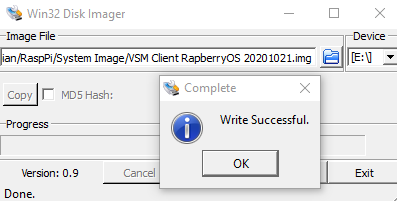
When formatted, go back to Win32 Disk Imager and click Write. The software image will then be written to the MicroSD Card.
This may take up to 30 minutes to complete.
When complete, click ‘OK’ and close Win32 Disk Imager.
If the error persists, create a clean partition following the instructions given here, then start again from the top of this section.
Connecting to the Customer's network and Customer Configuration
Remove the Micro SD Card from your PC or adaptor and insert this into the slot on the bottom of the Raspberry Pi.
The card contacts face the Raspberry Pi board.
Connect the Raspberry Pi and your PC to the same network (same subnet) with a cat5 or higher Ethernet cable.
Connect the Micro USB power supply to a power source (Preferably UPS and surge-protected), then insert the micro USB cable into the port on the side of the Raspberry Pi. At this point, the Raspberry Pi will begin to boot up.
Navigate to where you extracted the RPi.zip file, then go into the VSMManagementTool directory and run VirsaeManagementTool.exe as an Administrator.
You may receive a Windows Security Alert popup. If you do, check the details by referring to Virsae Group Ltd and Virsae.com.
Once you have verified that everything is secure, click 'Allow Access':
The Virsae Management Tool will open and will automatically detect the Raspberry Pi:
If the management tool shows multiple panels, the newly imaged RaspberryPi will be the one that has blank "Customer" and "Location" fields.
Additionally, its "Connection to Virsae" field will say "Not Connected".
Right-click on the Detected Raspberry Pi and select ‘Set Customer and Location ID’s via the Web’:
This will open the Virsae Setup window. You will need to enter your Virsae credentials and log in:
Once logged in, you will need to select the Customer and Location that you set up through the VSM Web Portal:
Click Setup Customer/Location Id.
The Customer and Location Id Setup window will close. The Customer and location fields will now be populated correctly in the VSM Express Tool:
Static IP address setup
To set a Static IP address on the Raspberry Pi you can either reserve its address via DHCP or you can set a static IP address and configure it manually on the Raspberry Pi.
To configure the IP address manually right click on the Raspberry Pi in the VSM Express Tool and select Connect Via SSH:
VirsaeTTY will launch and you should receive a login prompt to the Raspberry Pi operating system, use the following credentials (They are case sensitive):
Raspberry Pi SSH Credentials
Username | Password |
administrator | Administrator |
After entering the credentials you will be given the Debian command prompt:
Raspberry Pi 2 Model B
Enter the command below and hit enter:
$ sudo nano /etc/network/interfaces
The Nano text editor will open with the Interfaces file.
This file needs to be edited to change the ‘iface eth0 inet dhcp’ line to ‘iface eth0 inet static’.
You will also need to enter the following lines to this file, see screenshot below for an example.
Raspberry Pi Static IP Address Details
Line | Value |
address | The IP address you want VSM Express to assume (in the proper range for you network). Note: Pay attention to not use an IP already used by another device in your LAN or that can be assigned to another device by your router via DHCP |
netmask | 255.255.255.0 |
network | Same format as your IP address but usually ends in .0 Note: If for example your LAN is configured to have IP addresses in the range x.x.x.1 to x.x.x.255, you will put x.x.x.0 in the network line. |
broadcast | Same format as your IP address but ends in 255 |
gateway | This is usually your router IP |
Once complete, press ‘Ctrl + X’ to exit the nano editor.
You will be prompted to save the modified buffer. If you are happy with your changes press y, if not press n:
If you press 'y', you will be asked where you want to save this file. Check that the location is /etc/network/interfaces and then press enter:
You will drop back to the Debian command prompt.
To set the DNS server we will need to edit the /etc/resolv.conf. Enter the command below and hit enter.
$ sudo nano /etc/resolv.conf
Change the ‘nameserver’ IP address to your DNS server, then press ‘Ctrl + X’ to exit the nano editor:
You will be prompted to save the modified buffer. If you are happy with your changes press y, if not press n:
If you press 'y', you will be asked where you want to save this file. Check that the location is /etc/resolv.conf and then press enter:
You will drop back to the Debian command prompt.
Raspberry Pi 3&4 Model B
Enter the command below and hit enter:
$ sudo nano /etc/dhcpcd.conf
The Nano text editor will open with the dhcpcd.conf file:
Scroll all the way to the bottom of the file and add one or both of the following snippets, depending on whether you want to set a static IP address for a wired connection (eth0 = wired) or a wireless connection (wlan0 = wireless).
You’ll need to edit the addresses in the snippet to match your network configuration.
Wired Ethernet
interface eth0

static ip_address=192.168.0.10/24
static routers=192.168.0.1
static domain_name_servers=192.168.0.1
Wireless Ethernet
interface wlan0

static ip_address=192.168.0.200/24
static routers=192.168.0.1
static domain_name_servers=192.168.0.1
Raspberry Pi 3&4 static IP address details
Line | Value |
Interface | This defines which network interface you are setting the configuration for, eth0 = wired, wlan0 = wireless. |
Static ip_address | The IP address you want VSM Express to assume (in the proper range for your network). Note: Pay attention to not use an IP already used by another device in your LAN or that can be assigned to another device by your router via DHCP (Make sure you leave the /24 at the end) |
Static routers | This is the IP address of your default gateway |
Static domain_name_servers | This is the IP address of your DNS |
Once complete press ‘Ctrl + X’ to exit the nano editor:
You will be prompted to save the modified buffer. If you are happy with your changes press y, if not press n:
If you press 'y', you will be asked where you want to save this file. Check that the location is /etc/dhcpcd.conf and then press enter:
You will drop back to the Debian command prompt.
Restart the Raspberry Pi
You need to restart your Raspberry Pi for the changes to take effect. Type the command ‘sudo reboot’ and hit enter:
The Raspberry Pi will restart and your session will be dropped. When you receive an error message, click 'OK' and close the VirsaeTTY application:
Give the Raspberry Pi a couple of minutes to restart and then discover it using the Virsae Management Tool.
If done correctly, you will see the Raspberry Pi listed with its new Static IP address.
If not, you will need to find where you have gone wrong, or diagnose why it cannot communicate with its static IP details.
You may need to start from the beginning by burning a fresh image onto the MicroSD card: